Tuesday, December 29, 2009

The Doctor's Sourdough Bread

This is from the Carl Griffith site. I have made slight adjustments to the original recipe.

The Doctor’s Sourdough BREAD

1 c Sourdough Starter
2 c Warm Water
2 c Warm Milk
1 Tbsp Butter
2 1/4 tsp SAF Yeast
1/4 c Honey
7 c Unbleached Flour
1/4 c Wheat Germ
2 Tbsp Sugar
2 tsp Salt
2 tsp Baking Soda

OPTIONAL: Add 1/4 c wheat bran, 1/4 c oat bran, 1 c whole wheat, rye, or kasha flour (adjusting the white flour volume) to increase the dietary fiber.

Mix the starter and 2 1/2 cups of the flour and all the water the night before you want to bake. Let stand in warm place overnight.

Next morning mix in the butter with warm milk and stir in yeast until dissolved. Add honey and when thoroughly mixed, add 2 more cups of flour, and stir in the wheat germ. Sprinkle sugar, salt, and baking soda over the mixture. Gently press into dough and mix lightly. Allow to stand from 30 to 50 minutes until mixture is bubbly. Add enough flour until the dough cleans the sides of the bowl. Then place the dough on a lightly floured board and knead 5 minutes until a silky mixture is developed.

Form into loaves, place in well-greased loaf pans 9 x 3 size or in French bread pans. Let rise until double, about 2 to 3 hours in a warm room. Place pan with 3 c water in bottom of oven for steam. Then bake in hot oven, 400 degrees F. for 20-25 minutes. Remove from pans and place loaves on rack to cool. Butter tops of loaves to prevent hard crustiness. Makes 4 1-lb Loaves (I have had it make up to 7 pounds of dough on a wet day. Yield will depend on many factors, including weather and humidity.)

Homemade Cottage Cheese

Cottage Cheese

1 gallon fresh milk
3/4 cup white vinegar
1/2 teaspoons kosher salt
1/2 cup half-and half-or heavy cream

Pour the skim milk into a large saucepan and place over medium heat. Heat to 120 degrees F. Remove from the heat and gently pour in the vinegar. Stir slowly for 1 to 2 minutes. The curd will separate from the whey. Cover and allow to sit at room temperature for 30 minutes.

Pour the mixture into a colander lined with a tea towel and allow to sit and drain for 5 minutes. Gather up the edges of the cloth and rinse under cold water for 3 to 5 minutes or until the curd is completely cooled, squeezing and moving the mixture the whole time. Once cooled, squeeze as dry as possible and transfer to a mixing bowl.

Add the salt and stir to combine, breaking up the curd into bite-size pieces as you go. If ready to serve immediately, stir in the half-and-half or heavy cream. If not, transfer to a sealable container and place in the refrigerator. Add the half and half or heavy cream just prior to serving.

Monday, December 28, 2009

Homemade Canned Cat Food

This is from a forum I am on. I am excited to try this recipe!

Homemade Canned Cat Food

6 whole chickens or 20 lbs leg quarters
6 lbs chicken livers
1.5 lbs Yellow veggies (carrots, pumpkin)
1.5 lbs Green veggies (green beans, zucchini, collards)

The evening before: Bake chicken at 350 for 2 hours, cover or lower temp halfway. Cool quickly on cold porch or on dinner plates. Use heavy rubber gloves and strip meat from bones as soon as you can handle it, skin and all. It is quick when you are not picky! I put my stand mixer in the sink with the grinder attachment and strip it right into the grinder, and into two of the biggest mixing bowls you've ever seen. A couple big plastic pails would work, too. Run the livers through the grinder, too, raw (yuk!)

Put all bones in a large stock pot or crockpot, cover with filtered water or well water, and simmer overnight. No onions or garlic or salt.

Next day: Strain broth, use a bit to run the veggies through the blender, or run them through the food processor w/o broth. Add veggies to ground meat, and add enough broth to moisten the meat, the more the better. Let them have some of the fat, too, adjust according to their weight. Don't make it fat-free, they need some fat.

Pressure can it at 11 lbs in pint jars for 75 minutes, cold pack method.

The recipe makes about 30 pints.

Sugar Syrup for Canning

Sugar Syrup for Canning


Light: 2 cups sugar, 4 cups water, makes 5 cups syrup.

Medium: 3 cups sugar, 4 cups water, makes 5 1/2 cups syrup.

Heavy: 4 3/4 cups sugar, 4 cups water, makes 6 1/2 cups syrup.

Canning Pears Photo Tutorial

The process of canning pears was not as hard as I thought it was going to be. It would have been faster with a friend to help with the peeling, but as it was, it took just an hour to prepare the fruit for canning.

First, peel the fruit. Using a veggie peeler worked the best for me. Then cut the pears in half.

peel the pears

The cores are simple to remove with a spoon. I was so happy to see the pear half look just like what commercially canned fruit look like! I am easily amused.

remove the cores

Have a large bowl available half filled with salted water. I don't measure the salt. It might be a tablespoon or so. When the fruit is cored, soak it in the salted water. This keeps it from turning brown.

pears are prepared

Make a sugar syrup to cover the pears with in the jars. You can make light, medium, heavy or extra heavy, using different proportions of sugar to water. I use a light or medium syrup for my fruits. You can also cover pears with commercial white grape juice or apple juice. I haven't done that, though.

make a sugar syrup

Rinse the pears well to remove all the salt water. Pack pear slices into jars as tightly as you can. I fit 10 halves into each quart jar. When I do them again, I will force in two more, since I had a little room in the jars after they cooked. I will also use wide mouth jars rather than regular. Cover with your prepared syrup and remove any trapped air with a rubber spatula or other tool. I use a chopstick.

Remove the air bubbles

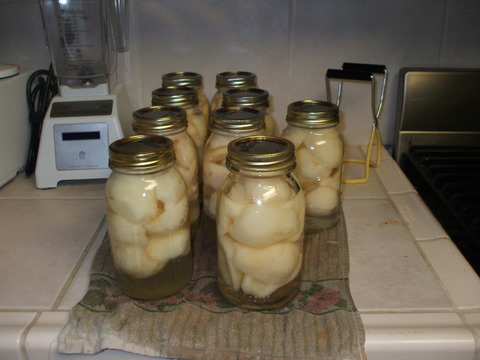
Can quarts of pears in a boiling water bath for 25 minutes (at 0-1000 ft. Adjust time for your elevation). Pints will need 20 minutes. Remove to a towel overnight to cool and seal. Wash the jars in the morning, since they will probably be sticky. You don't want to attract ants!

The finished product

Tuesday, December 22, 2009

Hot Cocoa Mix

I made this recipe the other day. I found it on MotherHen's wonderful blog.

* 1½ cups cocoa
* 2 cups sugar
* 4½ cups instant non-fat dry milk

Pour ½ cup boiling water into a pint jar. Add ½ cup of the Hot Cocoa Mix. Stir well. Now add another ½ cup of boiling water, and ¼ – ½ cup of milk.

My Lambies liked it very much, even without the milk.

Wednesday, December 16, 2009

Silly Putty

Silly Putty


1/2 cup Elmer's glue

1/4 cup liquid starch

food coloring, if desired (1 drop for pastel, more for more intense color)


Mix in plastic storage bowl with hands. When mixture begins to clump, pick it up and knead and fold in your hands. Mixture will begin to soften, smooth and solidify as you work it.


This recipe made enough for my four oldest to enjoy a good sized dollop. I made it plain-colored, then added a drop of food coloring to each chunk so they could choose their own color. They just carefully folded the putty until the color was worked through.

Friday, December 11, 2009

Peanut Butter Squares

Peanut Butter Squares
1 lb powdered sugar
18 oz peanut butter (creamy or crunchy, but recommend a high quality brand)
½ cup white granulated sugar
1 ½ teaspoon vanilla
1 stick butter, melted
½ cup water

Mix all together and press into pan. Use 8x8 for thick fudge or 9x13 for quite thin.

Melt 6 oz chocolate chips with 1 stick of butter over low heat in a saucepan. Pour over the top of the peanut butter mixture. Let sit to harden before cutting.